Friday 29 October 2010

Little Baby Bears...

Hey!! :)


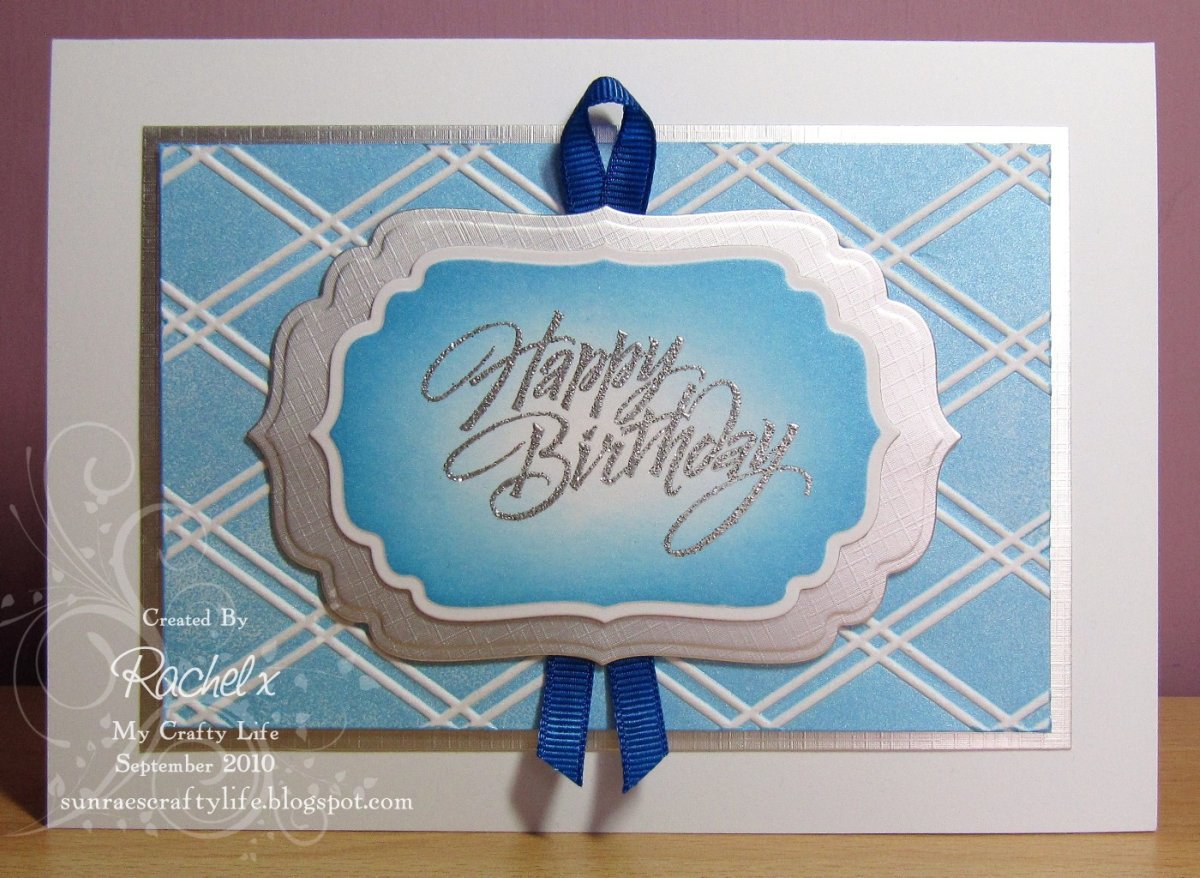
I have another set of fairly quick and simple cards to share today :) A family friend is due to have her first baby in the next couple of weeks so I wanted to get on and make the card so it’ll be ready whenever the little one decides to put in an appearance...only trouble with that theory is that they’ve decided they didn’t want to know the sex of the baby and I don’t see the point of being able to make your own cards to suit the occasion and then just doing a green or yellow baby card!! So I’ve covered all bases and made both...and while I was about it, I thought I may as well make a couple of spares for my box, too!! And here they are:


I simply couldn’t make enough space on my desk to get a shot of all four together in any normal way so there’s a bit of a precarious house of cards thing going on here- honestly I barely dared breathe!!lol I wanted to keep the colours very light and to use Polka Dots and Ginghams as I've seen several baby cards like that lately and really liked them :) Also, our friend was always very fond of Forever Friends when we were younger so I’ve been planning to use this stamp since we heard she was pregnant :)


I used the sketch at Just Cute Bears for the layout, which I really like :) The papers are all from an old Papermania kit that I got from QVC years ago and I edged them all with a ColorBox Cat’s Eye Chalk inkpad- French Blue for the boys and Pastel Pink for the girls. The circles are cut with Nesties and the ribbon slider with the smallest die from the Nellie’s Rectangle set. I used striped white ribbon as I want to enter these at Allsorts and wasn’t sure that Gingham would count for the stripes- why is it that no matter how big a selection of papers you have, you never have the combination of colour and pattern that you need!?!!!
lol


The bear is Forever Friends and for the first time I’ve tried colouring an FF image with Promarkers. After a little trial and error, as I still don’t seem to have the many of the colours that most people use for them, I settled on Oatmeal for the shading followed by Pastel Yellow all over and the Ivory over that to tone it all down a bit. Room for improvement for sure but for now don’t think they came out too badly and at least now I won’t have the problem of which ink to use as I did when I was still colouring the bears with water-based pens and then wanted to use my PMs on the rest of the image!!! :S The sling is paper pieced and the greeting is from a cute Woodware Clear baby set. Then just some flat-backed pearls and a few touches of Stardust Stickles and I was done!! :)

So, I’d like to enter these in the following challenges: Just Cute Bears and Friends – fab Sketch :) ; Allsorts – Spots and Stripes :) ; Wild Orchid Crafts – Pastels :) ; and Top Tip Tuesday – Anything Goes :)

Thanks for reading and for any comments you might leave!! :) I hope you’re all well and have a good weekend- is this the one where the clock change gives us an extra hour’s sleep or when we lose an hour?! I can never remember but I hope for extra- we should get something to make up for the darkness and cold after all!! ;)

hugs,

Sunday 24 October 2010

Playing with colour :)

Hello bloggers!! :)

Well, it certainly didn’t get any warmer after my little rant about the weather the other day so I won’t even bother mentioning the appalling cold I was greeted with when I stuck my head out from under my duvet today... :[ lol

As my title suggests, I’ve been having a play with my inks this week and trying a new technique which I’ve been seeing around blogland this past few weeks...and I really enjoyed myself!! :) Again!! :) I’ll probably jinx it by saying this but I’m really having fun with my crafting again at the mo’ after a patch of struggling to get anything made and not much liking the results, which was preceded by another patch of really enjoying myself...so I guess it’s all cyclical and it’ll be back to struggling again soon but, until then, I’ll enjoy it all!! :) Does this happen to anybody else or am I on my own in strangeness again!?! :D

Anyway, on to the cards: They’re very simple really and I can only tell you what I did as I can’t really remember where I got the idea from or even how it was really explained...just that it involved masking with Post-It notes!! :) Think it may have originated in a magazine, though?

So I masked the shape I wanted with the Post-Its on the front of the smooth white card blanks (I made a few botched attempts before I gave in and measured so I stuck them on straight- measure twice, cut [Ink] once and all that!! ;) ) and used Cut ‘n’ Dry Foam to apply Distress Inks. Once that was dry I used a variety of stamps from Kanban’s Autumn Silhouettes and Spring Silhouettes with Onyx Black Versafine over the top :) And it was that simple- no cutting, no DS Tape/Foam pad backings to faff with- I love it, three cards I needed to make, plus a spare and I had fun making them (unlike usual with rushed ones!!) :)


I’ve made several using the same technique but different ink combinations- though one had to go in the post before I'd finished the others so it's not in this pic!! :)


This first one was Broken China and Dusty Concord- my two fav colours of DI...and just generally my two fav colours!! :)


The second had Broken China, Dusty concord and Spun Sugar with a very pretty tree stamp that's one of my favourites in the sets :)


The third had Broken China, Dusty Concord and Milled Lavender :)


And for this one I used Antique Linen and Vintage Photo with Vintage Sepia Versafine on a cream card blank just to try something different :) It’s one of my new Craftwork Cards blanks which I’ve not tried with DIs before and it wasn’t blending as well as I’d expected so I decided to play that up and make it a bit rougher looking, which I thought kind of worked with the more natural look of the colours and trees anyway. The border around the edges was made by turning the Post-Its around and inking outwards...not the original intention at all but desperate fix after I discovered I’d got inky finger prints on the edges of the card!! I like the effect though, so I’m quite happy it happened :) Not so happy about the smudges on the back that I can’t do anything about, though, and it always seems to happen when I ink base cards no matter how careful I am or what I put underneath to try to absorb the excess- any ideas on how to stop it would be much appreciated as I really don’t like giving, let alone selling, cards with smudges all over them!! :{

Oh, and nearly forgot- the sentiment on the brown card is Woodware Clear Magic Jane’s Script and on the others I used an old Whispers mini :)

I’d like to enter some of these cards in the following challenges: The first three (as one entry) with the Butterflies in: An Oldie But A Goodie – Add A Butterfly :) I’ve loved the concept of this challenge from the start as I have so many stamps and too many of them sit sadly neglected, but this is the first time I’ve been able to enter- all the stamps I used are at least a year old :) ; and Flutter By Wednesday – Open Challenge :) Again, a first time entry :) And I’d like to enter the last card, the natural colours one, in: The Stampman – Cards For Men :) ; and Cards For Men – Happy Birthday :)

I’m off to link these up and then have a cuppa :) Thanks for all the lovely comments on my card and jewellery for my Gran, they’ve really made me smile and helped me feel more confident in them as I get so nervous sometimes especially with giving my jewellery!! :) My dad gave her the jewellery yesterday and she called me straight away to say thanks- she was very happy- which meant so was I :) Hope you’ve all had a good weekend despite that horrible weather...that I’m still not bothering to mention, ofc!! ;)

hugs,

Thursday 21 October 2010

Silver and Pearls...

Hi!! :)

Eurgh- it’s sooo cold today!! :( I have enough trouble with feeling cold all through the year (another M.E. thing :[ ) but I’m really not too pleased about having to be permanently within reach of a hotwater-bottle before the end of October!! I’m sensing I’d best get used to it though- feels like we might be in for another bad winter :[ Anyway, to more pleasant things... today I thought I’d show you the second instalment of my crafting spree for my Gran’s 80th birthday – a necklace and earring set which I made for her :)


It’s made with Glass Pearls and Sterling Silver findings; the pearls are a mixture of white, cream and mocha colours as those will work well with my Gran’s favourite clothing colours- browns/caramels/creams :)


The design was inspired by a necklace I saw on tv somewhere, but I adapted and built on that to make it more interesting, using different colours and sizes of bead :)


The earrings made to match :) The large pearls are hung on two links of chain and then the smaller ones are attached to the top link so they nestle onto the main one a little closer than in the necklace :)

My Gran hasn’t received this yet as I gave it to my Dad to take down when they visit, rather than chance it in the post, and that’s not ‘til this weekend, so I’m still feeling a little nervous about whether she’ll like it :S She and my Grandad have never really seen any of my jewellery before, though they do know I’ve been making odd things for a while, so I’m hoping it will be a good surprise :)

My Gran did, however, really love the card (in my last post below)- it’s a lovely feeling, isn’t it, when you make something that’s really personal for a special occasion and it’s truly appreciated?! Though, of course, I wish so much I was able to be there with her as I know that would mean more than any card, I could tell from her voice when we spoke that she really did love it and appreciate every bit of the time and energy that went into it, and I have to say it made me feel very happy that I’d made her feel loved as she always has me :)

...but enough of my soppiness!! ;) I don't know if it's okay to enter jewellery into challenges that are probably designed for cards/papercrafts but, if it is, I''d like to enter this in the Top Tip Tuesday Anything Goes challenge :)

Thank you for all the lovely comments I’ve had on the card already!! :) I’ve been trying a new technique I’ve seen around blogland recently in the last couple of days so I’ll be back soon with the finished articles, I hope :)

hugs,

Monday 18 October 2010

Introducing the Art Deco Ladies in 'Floral Celebration' ... :) :)

 Hello!! :)

I 've been 'umm'ing and 'ah'ing about which of the several things I want to share on here would be next and eventually decided that I'd just get on and show you the card I made for my Gran's 80th birthday this week- it's my favourite of all the things I want to share :) It was a bit of an epic under-taking and, to be honest, actually ended-up taking a fairly insane amount of time (ie. most of last week!!) but I really enjoyed making it and am as sure as it's possible to be that my Gran will love it as much as I do, so totally worth it all!! :) There's quite a lot going on in the card, I've probably included more pics than strictly necessary and knowing me there'll be a lot of words, too, but I hope you'll bear with me!! :S  Anyway, without further ado, here it is:

The card from the front, as it's designed to stand in a slight curve :) It's basically two 6" Sq. Easel cards turned on their sides and stuck together at the back with another piece of card, but I did end up varying the placement of the fold, putting it closer to the spine of the card blank, as it just didn't stand right with the fold in the centre as per a normal easel- this way it has a much smoother 'curve' to it :) All the papers are from my new Basic Grey Kioshi Pad, which I've had my eye on for a while before finally deciding to get it just a couple of weeks ago, and when I looked through it the colour-scheme for this card just fell into place :)


The images are from a stamp set called Deco-lightful by Dimension Forth. I first saw them on C&C around this time last year and, as my Gran (and I!!) both love Art Deco and Twenties inspired ladies, I immediately knew they'd be perfect to make a special card for her this year- I had to wait 'til they came back in stock in January to get them but, since then they've been sat in my drawer just waiting to be used- I told myself my Gran's card would be the first one I'd use them on and I've stuck to that, though it's not been easy to resist playing!! :) The images are stamped in Memento London Fog for a softer look then coloured with  Promarkers- I think I'm finally getting a bit more used to the PMs and having less disasters and I certainly don't think I could've done these beautiful stamps any kind of justice with any other medium I've tried so far :) I used: Lilac and Lavender with Duck Egg and Pastel Green, as well as some Amethyst for accenting and to bring the stronger colours from the ribbon and purple paper in to the image. They're mounted on Nestie Labels cut from linen-textured silver cardstock with a satiny finish. The background paper is the prettiest shade of green from the Kioshi pad, edged with a little Milled Lavender DI, the swirls are Marrianne D cut from the Kioshi, too, and the ribbon is Anita's :)


The flowers are probably my favourite part of the whole thing as they're so totally different to anything I would normally do- since I already knew this card would need to go in a box to post it, I let myself play with out the usual restrictions :) They're made following this tutorial, which I discovered a few months back on Leanne's blog- thank you so much for sharing it Leanne, I've just been waiting for a special card to try them out on :) It basically involved die-cutting a huge number of different sized circles and then cutting spirals into them before quilling them into these pretty flowers :) I used three different types of cardstock- pearl, textured and plain- in slightly different shades and dabbed Milled Lavender all around the cut edges once the glue (I actually used Anita's Clear Glaze) had dried and followed that with about half a bottle of Crystal Stickles ... it took about three sessions for me to get them done- one to cut the circles, one to cut, quill and glue them and one to ink and glitter them plus an age to arrange them, which was by far the hardest/fiddliest part (they're stuck on with Silicone to make sure they'd stay at whatever angle I wanted them- mostly!! lol- but I had so much fun creating them from scratch!! :)  :)


A close up of the charm and an even closer veiw of the flowers!! :) lol- I couldn't resist!! :)


These pics show the 'inside' greeting panel and the decoration at the sides, which you can hardly see except when it's pulled right open but the satin card I used to stick the two easels together just looked a little plain and forlorn with out something so I quickly stamped and embossed this flower bouquet from the Deco stamp set and coloured it with Brilliance inks and a waterbrush :) The ribbon behind the Nestie labels is white coloured with the same PMs as the dresses, the label is edged with more DI and Stickles and the sentiment words are from several co-ordinating Woodware Clear sets and a SeeDs Alpahbet set (the '80th').


This is just to show the way the 'easels' are folded off-centre and the shape of the card a bit better :) I'm not sure any of my pics really show the '3D-ness' of the flowers that well but they only just fitted into the 2.5cm deep box!!


And, finally(!!), the little decoration I added to the front of the box we sent it in (inside a jiffy bag!) :)

Thank you so much for sticking with me through all of that!! :) I hope you think it was worth it...I'll find out tomorrow if my Gran does!! :)

Just one thing left to do now and, having already established that I went a bit mad with making the card and with photographing it, I figured I should go mad with challenges as well!! So, I'd like to enter this card in the following challenges: My Partner In Crafting Crime - Shine On You Crazy Diamond (if the copious quantity of Stickles counts!?!) :) ; Charisma Cardz - More Than One Fold :) ; Crafty Cardmakers Spotlight - Fancy Folds :) ; Craftalicious - Anything Goes :) ; Craft Your Days Away - Recipe- 1 Circle (at least), 2 Papers, 3 Ribbons (my circles were made into the flowers- too many to count!! :) ) :) ; Sweet Stampin' Challenge - Ribbon :) ; The ABC Challenge - F is for Flowers :) ; Allsorts - Let's Play Bingo (I chose the 3rd Column- Pearls, Stickles and Ribbon) :)  ; Papertake Weekly - 3 of a Kind (I used three Nestie panels and three different types of cardstock for my flowers) :) ; Wild Orchid Challenge - Pastels :) ; OSAAT- Embellish with your favourite things (Stickles, pearls and my new fav flowers!!) :) ; A Pocket Full of Posies - Champagne and Roses- A Celebration Card :) ; Lexi's Creations - Birthdays - Happy birthday to Lexi's Creations blog!! :) ; and Crafty Cardmakers - Use A Freebie (I used colours of Promarkers which I won as blog candy so they were free- if that doesn't count then please delete my entry!! :) ) :) 

Phew- now I *just* have to link them all...I might be back- sometime next year when I'm finished!!! ;) In the meantime, I hope you're all well and thank you so much for all the lovely comments on my last couple of posts- I think the Sepia Christmas idea will be getting plenty of use this year as a great way to make quicker cards as people seem to like it as much as I do!! :)

hugs,


Saturday 16 October 2010

Sepia Christmas

Hey!! :)

I have a few cards waiting to be blogged but I’ve been as busy as energy’s allowed this week with making my Gran’s 80th card – a bit of an epic and coming soon, so watch this space!!lol :) – so I’ve not got around to it... hopefully I’ll manage a few quick posts in the next week to catch up!! :)

Today’s has jumped the queue as I actually only made it last night but I wanted to share it as it’s something quite different for me and I’d love to know what you all think...

I spent yesterday trying to put together a few quick and simple cards for my mum to take to a Table Sale at her church today; they were mostly from Decoupage packs and my mum had made up the decoupage already while I was working on Gran's card, so I was just making up the cards around the images, but my head gets so bunged up with looking at all the different papers (which half the time don’t seem to match the images they came with :S ) that I really needed to do something to clear out the fug... and, while I was having a much needed rest, this idea came to me, so I dug out my stamps to have a play- and it worked a treat to blow the cobwebs away!! :)


The image is one of the LOTV stamps I got in the second Christmas release and hadn’t got round to inking up yet :) I stamped it in Versafine Sepia and then watercoloured it with Distress Inks Vintage Photo, Antique Linen and a touch of Tattered Rose for the faces :) Now, I know the colouring leaves rather a lot to be desired but, in my defence, it’s a long time since I’ve watercoloured and I’ve never done it with DIs plus, I was in a stupid kind of hurry to get things finished and in their bags for mum to take!! :S So, it’s definitely a case of ‘Could do better’ but, all in all, I was fairly happy with how it came out for a first try and I will be getting more practice as I really enjoyed doing it- very relaxing and simple with just those few colours!! :)


I inked the edge with the Sepia ink straight from the pad and added the ribbon, which is coloured with Cinnamon Promarker. I had been planning to mat it onto some gold card but, when I held it against the cream card blank I just loved it as it was (which was perfect given the rush I was in!!), so simple- I’m loving the CAS style at the mo’, aesthetically and in terms of making things easier energy/time wise. It’s not often that I can so happily blend my low energy with an end result I like!! :) To finish, I just added a little Platinum Stickles (I finally branched out from Crystal and got myself a few other colours and I’m loving this one!!) and a few touches of Sakura Clear Stardust on the lamp, and the girl’s scarf, though you can’t really make it out in the pic!! The greeting is from a Woodware Clear Set and stamped in the Sepia ink again :) I have no idea why the two photos should come out looking such totally different colours despite all my attempts to correct them- I think the reality is probably fairly well in the middle of the two!! :S

I’d like to enter this card in the following challenges: Winter Wonderland – Make It Vintage :) ; My Partner In Crafting Crime - Shine on you crazy diamond... :) and Papertake Weekly – Three of a Kind (I used three colours of DI) :)

Thanks for popping by- I hope you’re all having a good weekend!! My mum should be back soon from the table sale so I’ll find out what, if anything, has sold soon- I’m not holding my breath as she texted to say it’d been a bit slow going earlier... :S Ah, well, I had fun making this card at least!! :) See you soon with another card, I hope!! :)

hugs,

Sunday 10 October 2010

Another something simple...

Hello again!! :)


Two posts in one day- whatever next!?! ;) Well, I’ve had a crafty week this week, though not making cards for the most part, as I spent much of the week working on a jewellery set for my Gran for her 80th Birthday which I’ll share with you all in soon :) In the meantime, this is a card I made a couple of weeks ago but have been waiting for the time and energy to post...

It was for my Grandad’s birthday and, though I was quite pleased with the way it turned out in the end, I must admit that it isn’t a bit like what I’d intended to make- in fact, it’s an entirely different design idea!! I tend to go a bit mad with cards for my relatives and good friends who I don’t get to see as a way to try to show I care even though I can’t be with them for their special occasions but this time my ideas and ambition far out-stripped the time and particularly the energy I had at my disposal :S !! I’d just got some new bits and pieces and seen a great idea I wanted to try on another blog so, when the original idea started to go horribly wrong, I made the unusually sensible decision to go back to the drawing board and I thought I’d just have a play and see what happened...


I kept all fairly simple to show off my new Nestie labels (have been wanting to get my hands on these for ages!! :) ) and my new Argyle embossing folder :) I inked the inside front of the folder with Brilliance Sky Blue ink before putting the card in to emboss- a technique I saw on TV a while ago but had forgotten about before seeing it again on Julie’s wonderfully inspiring blog- and I love the effect :) I did have a bit of trouble with the end of the card near the open end of the folder getting smudges of the colour on the embossed lines which didn’t look too good, though, but when the second piece came out the same despite making sure the card couldn’t move in the folder, I cut good bits off both pieces and stuck them together...sneakily disguised by the ribbon!! ;)


I inked the label shape through the die after embossing- something else I saw a while ago and have been meaning to try!- and then used an old Hero Arts stamp (from the first set of stamps I ever bought when I started crafting, which has been lying neglected for some time) with silver glitter embossing powder in the centre. This and the main panel are matted on some lovely linen-textured card with a matt finish. Then, as it was a male card, I just added the little bit of grosgrain ribbon- in the opposite direction to what I’d intended, to cover the join in the card but I think it turned out better like that anyway- happy accidents!! :)

There were a lot of CAS challenges around when I made this card and I'm too late for almost all of them now after taking so long to post it but I’d like to enter this card in the following challenges: My Partner In Crafting Crime – Clean and Simple :) ; Crafty Cardmakers – Step Away From The Square (although my card is still a traditional shape, seeing this challenge made me realise that I’ve made many more square cards than anything else since discovering blogland!! Strange!!lol :) ; and Ellephantastic Challenges – Anything Goes :)

Well, I’ve had another not so great couple of weeks but it’s amazing what a trip to blogland (and probably the rare treat of some sunshine, too!!) has done to make me feel better so I shall pop off now, with a smile on my face, to link those up and wish you all good week to come!! :)

hugs,

Something to smile about... :)

Hey there bloggers!! :)

Well, I’m back at last but not with a card- for the moment anyway :) – as I’ve been given a lovely Award by the also lovely Rachel!! :) Thank you so much, honey- it really did make me smile when I saw that you’d chosen me and I really appreciate it- though I know it’s taken me a long time to do anything about it!! :S


In theory, you’re meant to give this award to another 15 people but, as I have barely anymore followers than that at the mo’ and would really just like to say thank you to everyone that has been kind enough to leave me such lovely comments recently, I’m just going to say that, follower or not, if you’ve taken the time to leave me a comment in the past and you’d like this award then please take it as every comment has helped make blogging one of the most positive, enjoyable and rewarding things I’ve been able to do for a long time :) :) So: thank you all :)

Thanks again to Rachel- if you’ve not already, do pay her blog Critchley Creations a visit as it’s full of beautiful cards and wonderful inspiration!! :)

Thanks for reading this and I hope I’ll be back again a little later with a card I’ve been wanting to post for ages...though I should really be getting on with making another one for my Gran’s 80th next week!! :)

hugs,

LinkWithin

Related Posts Plugin for WordPress, Blogger...